Showing posts with label food. Show all posts
Wednesday, May 11, 2016
Sweet Potato Feta and Arugula Quiche
I made this quiche last week and had to make it again. It's that good. The crust is simple to make and chock-full of healthy fats from the flax and chia seeds. A piece of this for breakfast will keep your stomach happy and full till it's time for lunch. This recipe is gluten free and vegetarian.
Sweet Potato Feta and Arugula Quiche
Ingredients for the crust:
½ cup plus 1 tablespoon oat flour
¼ cup plus 1 tablespoon grated parmesan cheese
¼ cup ground flax seeds
2 tablespoons chia seeds
2 tablespoons olive oil
1 egg
Ingredients for the filling:
1 small white onion, chopped (about 1 cup)
1 medium sweet potato, diced (about 3 heaping cups)
2 cups packed arugula
5 eggs
⅓ cup feta cheese
1 tablespoon pesto, store-bought or homemade
1 tablespoon butter
1 tablespoon olive oil
1 teaspoon kosher salt
1 teaspoon Italian seasoning
¼ teaspoon red chili flakes
Generous grinds of pepper
To make:
Preheat oven to 350 degrees F. In a medium bowl, mix together oat flour, flax, chia seeds, and parmesan cheese. Create a little well in the flour mixture and add the egg and olive oil. Mix well and let sit for 5 minutes. Form dough into a round disk and place between two sheets of wax paper. Using a rolling pin, flatten out the dough. Carefully remove the sheets of wax paper and place dough into a greased 9-inch pie dish. Press dough into the dish and up the sides. Pierce dough several times with a fork and bake for 10 minutes. Remove from oven and set aside until your filling is ready.
In a large frying pan on medium-high heat, add butter and oil. Once it’s nice and hot, add onions and 1 teaspoon salt. Give it a quick stir and cook for about 1-2 minutes. Add the sweet potato and cook, stirring frequently for 5 minutes. Add Italian seasoning, pepper and red chili flakes. Cook for about 3 more minutes. Add arugula, gently stir and remove pan from heat.
Crack eggs into a bowl. Reserve one of the yolks. Add pesto to the bowl of eggs and whisk for about a minute. Using a pastry brush, spread the reserved egg yolk all over the inside of the crust. Layer half of the sauteed veggie mixture, half of the feta cheese and half of the pesto egg mixture. Follow the same steps with the remaining ingredients. Bake in the oven for 30 minutes.
Labels:
breakfast,
easy quiche recipe,
food,
gluten free,
healthy,
lunch,
quiche,
recipe,
vegetarian
Sunday, October 25, 2015
Chocolate Chip Pumpkin-Zucchini-Banana Bread
I've posted quite a few breakfast bread recipes here. That's because they are so easy to whip up and a great way to have breakfast all week. Now that the weather is finally cooling down it's actually starting to feel like Fall. What do we do in Fall? Eat everything pumpkin! I'm not a PSL drinker but I do love everything else pumpkin. Just the other night I made a vegetarian green curry with pumpkin. It was so spicy and delicious. That should be a future post. Having leftover roasted pumpkin from that evening, I mashed it up and turned it into Chocolate Chip Pumpkin-Zucchini-Banana Bread. This bread is really yummy! I like to serve it toasted (so the chocolate melts) with almond butter and sliced banana. It's also a filling fiber rich meal which will keep you going until lunch.
Ingredients:
Dry ingredients
½ cup gluten free oat flour (blended up oats)
½ cup rice flour
¼ cup gluten free oat bran
¼ cup ground flax
¼ cup tapioca starch
¼ cup coconut sugar
2½ teaspoons baking powder
1 teaspoon baking soda
½ teaspoon salt
½ teaspoon xanthan gum
1 teaspoon cinnamon
A few dashes of ground ginger
A dash or two of ground cloves
Wet ingredients
1 cup mashed pumpkin (canned pumpkin could also be used.)
1 medium banana, broken into smaller pieces
⅓ cup canola oil
⅓ cup blackstrap molasses
2 teaspoons vanilla extract
¼ cup almond milk
1 egg
Add ins
1 medium zucchini, grated
½ cup semi-sweet chocolate chips
To make:
Preheat oven to 350 degrees. In a large bowl, sift together all dry ingredients. Gently mix to combine. In a food processor, blend all of your wet ingredients except for the egg. Once all wet ingredients have been mixed, add your egg and blend for a few seconds. Pour wet ingredients into the dry and mix together until all of the flour blend is saturated. Fold in zucchini and chocolate chips. Pour into a greased loaf pan and bake for 50-55 minutes.
Labels:
baking,
banana bread,
blackstrap molasses,
bread,
breakfast,
food,
gluten free,
meal prep,
pumpkin bread,
recipe,
zucchini bread
Tuesday, September 15, 2015
Roasted Banana Coconut Ice Cream with Chocolate Covered Almond Pieces
Ice cream is by far my favorite dessert. I always crave it. You would think that since I have my own ice cream maker, I would have a handmade batch on hand at all times. The truth is, I've only made real ice cream once. And it wasn't even for me! I have experimented with many alternative ice creams though. When I cook for myself at home, I always try to eat healthy and well. I don't worry about what I eat as much when my boyfriend and I prepare meals or go out. I love my burgers and will forever love him for introducing me to Queso, Texas style (Velveeta and Rotel). Having a balance in your diet is important. I give props to those who can restrict to the max, but for me, that is not possible. I love food too much! Anyway back to the ice cream. This is a non-dairy ice cream made with a base of bananas and coconut cream. The coconut cream gives off such a creamy texture! The ice cream itself is made without any refined sugars. (Cane sugar is an ingredient in the chocolate used to make the chocolate covered almonds.) This is a super simple recipe that you can feel good about eating.
Roasted Banana Coconut Ice Cream with Chocolate Covered Almond Pieces
Ingredients:
For ice cream
4 ripe bananas
2 tbs coconut sugar
3 tbs melted coconut oil
1 can coconut cream (I use Trader Joe's brand)
4 tbs agave nectar
½ teaspoon almond extract
Juice from half a small lemon
¼ teaspoon kosher salt
For chocolate covered almonds
½ cup semi-sweet chocolate chips
½ cup slivered toasted almonds
1 teaspoon coconut oil
pinch of salt
generous pinch or two of coconut sugar
To make:
Preheat oven to 370 degrees F. Peel bananas and slice lengthwise. Lay bananas flat side down on a silpat or foil lined baking sheet. Sprinkle with coconut sugar and drizzle with the coconut oil. Gently roll bananas around the baking sheet to coat with the sugar and oil. Bake for 20 minutes. Remove from oven and let sit for 5 minutes. Add bananas and sugary goop to a food processor and blend till smooth. Scrape down sides of the bowl and add coconut cream, agave, lemon juice and salt. Blend again to incorporate all ingredients. Transfer food processor bowl to the fridge and allow mixture to cool for at least 15 minutes. Pour into ice cream maker and follow manufacturer's instructions.
Now it's time for the chocolate covered almonds! In a small saucepan over very low heat add your chocolate chips and and coconut oil. Stir constantly to prevent chocolate from burning. Once your chocolate is melted and smooth, remove from heat and mix in almonds. Stir to coat evenly and spread out mixture on a small baking tray lined with parchment or foil. Sprinkle with salt and coconut sugar. Place in the freezer to set.
About 2 minutes before the ice cream churning is complete, remove chocolate covered almonds from the freezer. Break apart with your hands or roughly chop. Add them to the ice cream.
After ice cream is done, transfer to a loaf pan and place in freezer overnight or for at least a few hours, until firm.
Wednesday, June 10, 2015
Chicken & Veggie Patties
Tuesday is my "Sunday" so I typically do most of my meal prepping on this day. The last few weeks I made different kinds of patties. Whether they are a mixture of chicken/veggie, veggie/beans/rice, or even tuna with sprouted peas and lentils (which were really delicious), they are the perfect option for lunches throughout the week. It's also a great way to use up leftover ingredients you have in your fridge. I normally just throw whatever I have in a bowl, mix it up and they turn out great. However, I figured I should measure out my ingredients this time so I can share the recipe. Check it out below and feel free to play around with ingredients and spices to tailor it to your liking. I tend to eat them cold with salads, but they can be heated up as well.
Ingredients:
1lb ground chicken
1 egg
1 cup spinach, chopped
½ cup red bell pepper, diced
½ cup tomato basil feta, or plain
¼ cup white onion, diced
¼ cup green olives, roughly chopped
2 cloves of garlic, minced
½ teaspoon smoked paprika
½ teaspoon cumin
¼ red chili flakes
Salt and pepper to taste
To make:
Preheat oven to 370ºF. In a medium/large bowl, combine all vegetables and spices. Stir to combine. Add ground chicken and use your hands to incorporate ingredients. Create a little well in the center of the bowl and add the egg. Again, use your hands to combine. Using a ¼ size measuring cup, scoop chicken mixture onto a lined and greased baking sheet. The measuring cup should create a nice patty shape. Once you have all your patties scooped, place them in the oven for 8 minutes. Flip and cook for an additional 8 minutes. Set your oven broil setting to low and cook for 2 more minutes. Remove from oven. Let cool for a few minutes if you will be eating them right away. You can enjoy these warm with a salad or make a burger out of them. I usually let them cool a bit longer before storing in the fridge.
Labels:
baked,
chicken,
dinner,
easy recipe,
food,
gluten free,
healthy,
lunch
Tuesday, May 19, 2015
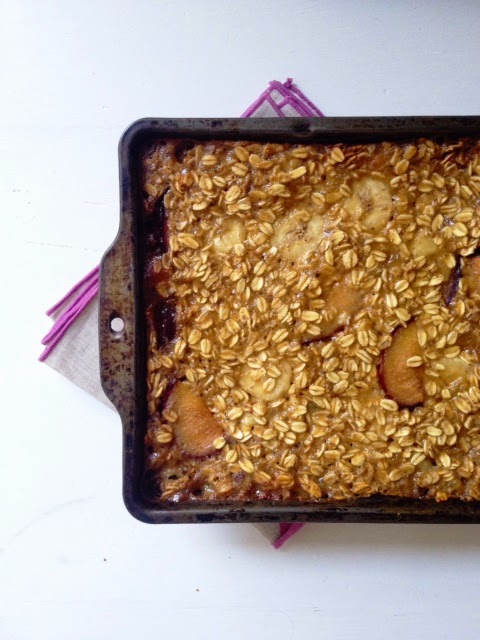
Banana-Plum-Raisin Oatmeal Bake
Last week my mom and I were down in Anaheim. Disneyland used to be the only thing I cared about in the area, but now I have a new stop I must make every time I'm down there. 99 Ranch Market! On a previous trip to Disneyland, my coworker took me to this amazing Asian market on our way home. I was in heaven. We spent over an hour browsing through all the spices, sauces, teas and yummy treats. Once we left I couldn't wait to return. They also have a hot food station, which I was dying to try on my next visit.
The food didn't disappoint. We got a few snacks to fuel us for shopping. Sugar cane shrimp, pork buns, scallion cakes, and turnip cakes. Everything was so fresh and delicious. I'm a huge Dim Sum fan, so this was perfect! The market is pretty big, so I suggested we start at one end and make our way down each aisle. I had a list of things I wanted to purchase again but also had my eyes open for new items I wanted to try. One item that caught my attention was a coconut spread (Ma Tamis Sa Bao). It's just coconut cream, brown sugar and water. It looks similar to caramel and has the same consistency.
This stuff is delicious! It's smooth and creamy with a subtle coconut flavor. I read online that it can be substituted for molasses in pecan pie. Now that is something I must do soon. Instead of dessert, I decided to use it in place of maple syrup in an oatmeal breakfast bake. The finished product came out great. It's not too sweet and the flavors of the coconut with cooked bananas are just perfect. This oatmeal bake is gluten free and vegan friendly.
Ingredients:
2¼ cup gluten free oats
1 tablespoon ground flax seeds
1½ teaspoon baking powder
¼ teaspoon kosher salt
2 bananas, 1 sliced and reserve the other for wet ingredients
1 plum, sliced
½ cup golden raisins
1 can (14oz) light coconut milk
⅓ cup coconut spread
1 teaspoon vanilla
To make:
Preheat oven to 370ºF. In a large bowl, add oats, ground flax, baking powder and salt. Stir to combine. Toss in sliced banana, plum and raisins and set aside. In a food processor, combine coconut milk, coconut spread, the remaining banana and vanilla. Pour wet ingredients into the dry and gently stir to saturate all of the oat mixture. Pour into a greased 8x8 baking dish. Press the mixture down gently with a spatula. Place in the oven and bake for 30 minutes. Let cool for at least 10 minutes before serving. I made this the day before and once cooled, I covered it and stored in the fridge. It reheats easily in the microwave or oven and if you'd like an extra kick of protein top with a scoop of cottage cheese or yogurt.
Labels:
99 ranch market,
banana,
breakfast,
food,
gluten free,
oatmeal bake,
plum,
raisin,
recipe,
vegan
Tuesday, February 3, 2015
Tortilla Chip Crusted Chicken Tenders
What do you do with those last bits of crumbly tortilla chips at the bottom of the bag? Some may crumple up the bag and throw them away, but there are quite a few things that can be done with those tiny little highly seasoned pieces. I'm one who hates to waste so I try my best to use every last bit of what is left. Even more so now that I have been reading An Everlasting Meal from Tamar Adler. Her approach to cooking food is simple but elegant and rustic at the same time. Since starting her book, my desire to experiment in the kitchen has grown so much more than before. I can be baking all morning at work yet when I come home, I'm ready to continue spending my time in the kitchen. Yesterday was my day off and I spent the majority of it in my happy place. I love spending time preparing food. It's zen-like to me. Some people think I'm silly for taking the amount of time I do to prepare my meals but it's a process for me. A process I enjoy very much.
A process I don't enjoy very much is writing recipes. I've had people on Instagram ask for recipes but to me, the act of stopping my flow to write down measurements just ruins the experience. Hence, the reason why I haven't posted anything in six months. I understand that baking is a science and is deserving of a written recipe, but I want to try something new on this blog for non-"baking" items and simply talk through the process. Recipes have always been difficult for me to follow anyway. They just don't ever come out right. You have to take into account that all the variables are different for each person preparing the recipe. Altitude, heat of your oven, gas or electric range. Tamar Adler touches on this subject in her book and it's the first time I found someone else who gets it. "No matter how well a cookbook is written, the cooking time will be wrong. Ingredients don't take three or five or ten minutes to be done; it depends on the day and the stove. So you must simply pay attention, trust yourself, and decide" (64).
Now back to those tortilla chips, which is the whole purpose of this post. I decided to use them as the breading for chicken tenders. I had raw chicken in the fridge that needed to be cooked but I wanted more substance than just plain baked chicken for lunch. First things first, I preheated the oven to 350°F. For the breading, I took a glass jar (any heavy object will work) and smashed the leftover bag of chips to even tinier pieces. I poured the crumbs into a shallow bowl and added a little bit of cashew nut flower along with salt, pepper, red chili flakes, and smoked paprika. Everyone has different tastes so season to your liking. I was only coating about 6 pieces of chicken so adjust your ingredients as needed. (If you have a whole breast, slice into strips.) In another shallow bowl I added spelt flour for the initial coating of the tenders. In a third bowl, whisk one egg until combined. Use the spelt flour for the initial coating on the chicken. Dip into beaten egg and then coat in tortilla crumb mixture. Lay the breaded chicken down on a greased, foil-lined cookie sheet. Bake in the oven for about 12 minutes and then flip chicken pieces over. Change the oven temperature to broil and cook for about 4-5 more minutes. Watch out that you don't burn them. Remove from oven, let cool for a few minutes and enjoy!
I created a simple spinach salad topped with the chicken tenders and homemade pickled vegetables (carrot, fennel, and swiss chard stems.) I attempted to make the mayonnaise recipe from Adler's book, but as I've said before, I'm not good with recipes. My mayonnaise was a fail but after adding more salt, pepper, spices, and a little apple cider vinegar, it was a delicious salad dressing.
A process I don't enjoy very much is writing recipes. I've had people on Instagram ask for recipes but to me, the act of stopping my flow to write down measurements just ruins the experience. Hence, the reason why I haven't posted anything in six months. I understand that baking is a science and is deserving of a written recipe, but I want to try something new on this blog for non-"baking" items and simply talk through the process. Recipes have always been difficult for me to follow anyway. They just don't ever come out right. You have to take into account that all the variables are different for each person preparing the recipe. Altitude, heat of your oven, gas or electric range. Tamar Adler touches on this subject in her book and it's the first time I found someone else who gets it. "No matter how well a cookbook is written, the cooking time will be wrong. Ingredients don't take three or five or ten minutes to be done; it depends on the day and the stove. So you must simply pay attention, trust yourself, and decide" (64).
Now back to those tortilla chips, which is the whole purpose of this post. I decided to use them as the breading for chicken tenders. I had raw chicken in the fridge that needed to be cooked but I wanted more substance than just plain baked chicken for lunch. First things first, I preheated the oven to 350°F. For the breading, I took a glass jar (any heavy object will work) and smashed the leftover bag of chips to even tinier pieces. I poured the crumbs into a shallow bowl and added a little bit of cashew nut flower along with salt, pepper, red chili flakes, and smoked paprika. Everyone has different tastes so season to your liking. I was only coating about 6 pieces of chicken so adjust your ingredients as needed. (If you have a whole breast, slice into strips.) In another shallow bowl I added spelt flour for the initial coating of the tenders. In a third bowl, whisk one egg until combined. Use the spelt flour for the initial coating on the chicken. Dip into beaten egg and then coat in tortilla crumb mixture. Lay the breaded chicken down on a greased, foil-lined cookie sheet. Bake in the oven for about 12 minutes and then flip chicken pieces over. Change the oven temperature to broil and cook for about 4-5 more minutes. Watch out that you don't burn them. Remove from oven, let cool for a few minutes and enjoy!
I created a simple spinach salad topped with the chicken tenders and homemade pickled vegetables (carrot, fennel, and swiss chard stems.) I attempted to make the mayonnaise recipe from Adler's book, but as I've said before, I'm not good with recipes. My mayonnaise was a fail but after adding more salt, pepper, spices, and a little apple cider vinegar, it was a delicious salad dressing.
Tuesday, August 12, 2014
Balsamic Tomato Jam
It feels like my last few posts have all included jam. Well, I guess you can tell I love using it in everything and even more, I love making it. This pan jam is one of the easiest things to make. A friend of mine has the cutest little garden at her house. Her tomatoes are prime for the picking so she shared the abundance with me . Earlier in the week, I had already made some tomato soup and veggie quiche. I wanted to try something different so the jam idea sounded great! I was skeptical how it would turn out, as the cooking process was a bit different from the way fruit cooks down. But let me tell you, this stuff is amazing. My mom kept raving about the flavor and pairing it with cheese and crackers. I went the other route and added it to grilled cheese made with goat cheese and spinach. I'm excited to get more tomatoes so I can make this again soon. I already have some new yummy ideas of what I can do with it.
5 cups chopped fresh tomatoes
(heirloom, cherry, plum, yellow)
Juice from ½ lemon
⅓ cup agave nectar
½ teaspoon salt
2 tablespoons balsamic vinegar
To make:
Chop and measure 5 cups of tomatoes. In a large pot or deep pan, add tomatoes, lemon juice, agave, and salt. Turn heat to high-medium and gently stir to combine. Once the mixture starts to boil, continue to stir frequently to prevent sticking to the bottom of the pot. After about 5 minutes of cooking, add the balsamic vinegar. Continue to stir often for 25-30 minutes or until jam has reached a thickened consistency. Remove from heat and pour into two 8oz glass jars. Top with lids and store in fridge or freezer. I usually put one in each until I'm done with the first but I put both of these in the fridge this time because we couldn't stop eating it ;)
Labels:
balsamic jam,
condiment,
easy recipe,
food,
healthy,
homemade,
jam,
low sugar,
pan jam,
recipe,
summer,
tomato,
tomato jam,
vegetables
Tuesday, July 22, 2014
Banana Coconut Fudgesicles
Here is a super easy recipe for Banana Coconut Fudgesicles. This quick summer treat is creamy, healthy, and delicious! I love having these on hand in my freezer.
Ingredients:
2 very ripe bananas, frozen
1 can coconut cream
¾ cup semi-sweet chocolate chips
To make:
A day or two in advance, freeze very ripe bananas in a ziplock bag. You can break apart pieces or cut into slices. Heat coconut cream in a small pot on the stove over medium-low heat. Add chocolate chips and continually whisk until all the chips have melted. Pour mixture into a blender and add frozen bananas. Blend until you get a smooth consistency. Pour evenly into 10 popsicle molds and place in freezer overnight or until frozen.
Labels:
banana,
dairy free,
dessert,
easy recipe,
food,
frozen treat,
fudgesicle,
gluten free,
healthy,
homemade,
kid-friendly,
popsicle,
recipe,
summer,
vegan,
vegetarian
Saturday, July 12, 2014
Summer Quinoa Salad
Ingredients:
Salad
1½ cups uncooked quinoa
3 cups low sodium vegetable broth
½ tablespoon chili powder
1 can garbanzo beans, drained and rinsed
1 cup sliced black olives
1 cup green onions, sliced
½ cup cilantro, chopped
Dressing
¾ cup olive oil
¼ cup lemon juice
¼ cup low sodium tamari
½ teaspoon paprika
¼ teaspoon cumin
To make:
Using a fine mesh sieve, rinse quinoa under cold water. Add quinoa to a pot along with vegetable broth and chili powder. Give a quick stir and turn heat to high. Once the quinoa reaches a boil, turn heat to medium-low. You want a slow boil. Cook for about 25 minutes or until quinoa is done. Fluff with fork and allow to cool completely. Quinoa may be made a day in advance and refrigerated. In a large bowl, add cooked quinoa, and remaining ingredients for the salad. Gently mix well. In a smaller bowl, combine all your ingredients for the dressing. Whisk together and pour over salad. Stir to evenly distribute dressing. Cover and refrigerate until ready to eat. I like to chill it for an hour or two to allow the flavors to meld.
Labels:
dinner,
food,
gluten free,
healthy,
lunch,
meal prep,
pot luck,
quinoa salad,
recipe,
salad,
side dish,
vegan,
vegetarian
Monday, May 26, 2014
Cherry Apricot Pan Jam
Pan Jams are one of my favorite things to make. They are so easy and in a short amount of time you have delicious jam! No one will know the difference. Lately I’ve been using my last batch of strawberry jam to top my yogurt and granola in the mornings. It’s a great way to flavor and lightly sweeten plain Greek yogurt using natural sugars from the fruit and honey. This jam is also great as a topping for pancakes, added into smoothies or even muddled in cocktails. Since there is no canning process required, the jam needs to be kept refrigerated. It usually keeps for about a week or two in the fridge and up to a year in the freezer. One batch yields 16oz. This jam in particular is on the tart side which I prefer. If you would like a sweeter jam, add 1-2 more tablespoons of honey.
Ingredients:
2½ cups cherries, halved and pitted
2½ cups apricots, pitted and diced
½ cup honey
Juice from 1 lemon
Pinch of salt
To make:
In a large saucepan, add prepared fruit, honey, lemon juice and salt. Turn heat to medium high and stir to incorporate ingredients. Once the mixture reaches a boil, cook for about 18-20 minutes stirring frequently. About ¾ of the way through you may need to turn the heat down to medium low to prevent thickening jam from burning. Once jam is done, pour into two glass jars. Top with lids and place in fridge or freezer. I usually keep the second jar in the freezer until ready to use.
Labels:
apricot,
cherry,
condiment,
food,
fruit,
gluten free,
healthy,
homemade,
honey,
jam,
low sugar,
recipe,
refined sugar free,
stone fruit,
summer
Tuesday, April 15, 2014
Recently Shared Recipes
For those who don't know, I've recently started contributing recipes to an awesome new site called Collective Lifestyle. With that being said, I have been slacking with this blog. In case you missed them, here are the recent posts I've shared.
Matcha Latte
Superfood Pizza Crust
Cashew Coconut Butter Truffles
New Frontiers Quinoa Salad
Matcha Latte
Superfood Pizza Crust
Cashew Coconut Butter Truffles
New Frontiers Quinoa Salad
Labels:
clean eating,
coconut truffles,
dessert,
dinner,
drink,
food,
gluten free,
healthy,
lunch,
matcha latte,
pizza,
quinoa salad,
recipe,
recipe share,
snack,
sugar free,
vegan
Sunday, March 16, 2014
Gluten Free Chocolate Chip Ginger Pear Breakfast Bread
Chocolate Chip Ginger Pear Breakfast Bread, Gluten Free
Ingredients:
Dry
1 cup gluten free oat flour*
¼ cup brown rice flour
¼ cup almond meal
¼ cup potato starch
¼ cup ground flax meal
½ cup coconut sugar
1½ teaspoons baking powder
¾ teaspoon baking soda
½ teaspoon xnathan gum
¼ salt
Wet
1 egg
½ cup almond milk
¼ cup plain Greek yogurt
2 tablespoons canola oil
2 teaspoons vanilla extract
1 heaping teaspoon fresh grated ginger
Add ins
1 medium pear, diced (1 cup)
½ cup semi-sweet chocolate chips.
To make:
Preheat oven to 350º
In a large bowl, sift together all of your dry ingredients and gently mix to incorporate flour blend.
In a separate bowl, combine all wet ingredients and whisk well.
Pour wet ingredients into dry.
Mix well to saturate flour blend and then fold in the diced pear and chocolate chips.
Pour into a greased loaf pan and bake for about 40-45 minutes.
Remove from heat and cool.
*You
can purchase oat flour pre-ground at the store or you can make it
yourself by adding oats to a food processor and blending them down.
Labels:
bake,
bread,
breakfast,
breakfast bread,
chocolate chip,
coconut sugar,
food,
ginger,
ginger pear bread,
gluten free,
gluten free recipe,
healthy,
oat flour,
pear,
snack
Tuesday, January 14, 2014
Chocolate Chip Walnut Banana Bread
Ingredients:
3/4 cup spelt flour
3/4 cup oat flour
1 cup coconut sugar
1 teaspoon baking soda
1 teaspoon salt
1/2 cup butter, at room temperature
2 eggs
2 ripe bananas mashed, about 1 cup
1/2 cup Greek yogurt
1 cup chopped walnuts
1/2 cup dark chocolate chips
To make:
Preheat oven to 350 degrees.
Butter and flour a loaf pan. I used spelt flour.
In a large bowl, sift together flour, sugar, baking soda and salt. Using a spatula, gently mix well to incorporate all ingredients.
Using a hand mixer, blend butter in a medium bowl.
Add eggs and blend to incorporate.
Lastly, add Greek yogurt and mashed banana. Blend until all ingredients are combined.
Add the wet ingredients to the dry and mix well.
Fold in nuts and chocolate chips and pour into prepared loaf pan.
Bake for 1 hour 10 minutes or until a toothpick/skewer comes out dry.
Leave in pan for 10 minutes, then remove and cool on a wired rack covered with parchment.
This recipe was adapted from one found in a Martha Stewart magazine. Couldn't tell you which one... My mom has a million magazines and is constantly cutting out recipes for me. All I can say is that this bread is delicious!
Tuesday, November 26, 2013
Cranberry Orange Pan Jam
Thanksgiving and Christmas are right around the corner. My love for recipes with cranberries is so great this time of year. One of my favorites is what we do at work. We top cupcakes with the sugared berries. It's just so pretty with the contrast of the deep berry color and the whiteness of the sugar. Definitely brings on that joyous feeling of winter.
During the summer, I made a few batches of pan jams using stone fruit. I thought it would be great to make a batch using cranberries. I love pan jams because they are so easy to make. Since there is no canning process required, they need to be kept refrigerated. They usually keep for about a week or two in the fridge and up to a year in the freezer.
Cranberry Orange Pan Jam
Ingredients:
1 12oz bag of cranberries
1 orange - zest and juice
1/2 cup honey
2 tablespoons coconut sugar
2 stevia packets
(If you don't use stevia, I would suggest adding more coconut sugar since the berries are so tart.)
1oz Grand Marnier (Optional)
To Make:
Rinse cranberries and place in large bowl.
Heat 3 cups water in a pot just until it starts to boil.
Pour water over cranberries and let sit for 10 minutes.
During this time, zest the orange and set both zest and orange aside.
You will need the juice from the orange in the next step.
Drain cranberries and place back in the pot along with zest,
juice from the whole orange, honey, coconut sugar, and stevia.
Turn heat to medium-high and stir gently to combine all ingredients.
Continue to stir every few minutes.
After about 5 minutes cranberries will begin to burst.
Use a wooden spoon or silicon spatula to mash berries down.
Turn heat slightly lower after 5 more minutes and add 1oz Grand Marnier.
Cook for an additional 5 minutes or until jam looks thick.
Store jam in glass jars in the fridge or freezer.
This jam makes a great topping for pancakes as well as oatmeal and ice cream.
Monday, August 12, 2013
Panko Breaded & Baked Zucchini
Panko Breaded & Baked Zucchini, Gluten Free
Ingredients
Zucchini (I used 1 1/2 for this batch.)
Brown rice flour
Gluten Free Panko Breadcrumbs. Ian's brand is the best!
1 egg
Spices of your choice. I used salt, pepper & cayenne.
Prep
Preheat oven to 500 degrees F
Line baking sheet with foil and grease generously with oil.
Using a shallow bowl or dish, place 1/4 cup brown rice flour.
In another dish, place 1/4 cup panko breadcrumbs.
In a shallow bowl, add 1 egg and whisk with fork.
(Use additional egg, flour, and breadcrumbs if you want to increase the recipe.)
To prepare
Slice desired amount of zucchini.
Sprinkle slices with spices... that rhymes :)
Dip sliced zucchini in brown rice flour, then egg wash and finish with the panko breading.
Place on baking sheet and repeat till all are covered with breading.
Place in oven and bake about 7 minutes. Turn zucchini slices over and turn oven up to broil. Cook for about 5 minutes, maybe a little less. You want them to be a golden brown color.
Remove from oven and enjoy! They go well with various dipping sauces.
Tuesday, July 2, 2013
Lauren's Fruit Cobbler
Years ago my dad dated a women named Lauren. I remember the night my brother and I met her for the first time. I had a preconceived notion she was going to be some young bimbo. I guess that says more about my dad. Anyway, she was great. She was a lovely woman. Over the years we spent a lot of time together. I will always remember what a great cook she was. On our beach outings, she would pack a picnic with the most amazing sandwiches. One day she served us a piece of her fruit cobbler. Oh my, it was amazing! The best cobbler I had ever tasted. So buttery and delicious. It was always such a treat when she would make it. I had gotten the recipe from her but never made it until now. I had been thinking in my head of how I wanted to make a gluten free version. The original recipe calls for self rising flour and sugar. I tweaked the recipe to make it gluten and refined sugar free. It still tastes just like that amazing cobbler I had years ago.
This recipe is great because you can use whatever fresh fruit you prefer. The first time I made it, I used strawberries and blueberries. This time around I used fresh apricots from my friend Wallace’s tree.
Lauren's Fruit Cobbler,
Gluten and Refined Sugar Free
What you will need:Gluten and Refined Sugar Free
1/4 cup brown rice flour
2 tablespoons coconut flour
2 tablespoons tapioca starch
3/4 teaspoon baking powder
1/8 teaspoon xanthan gum
1/2 cup coconut sugar
1/2 almond milk, unsweetened (soy or regular would work as well.)
4 tablespoons unsalted butter
3 cups fresh fruit of your choice (if using stone fruits, pit first and then measure.)
1/3 cup honey
1/4 cup coconut sugar
To make:
Melt 4 tablespoons butter in a 9 inch baking dish, preferably glass or ceramic. I just do this right over the burner on the stove.
In another bowl, sift together your flour blend and coconut sugar. Add milk and mix well to combine.
In a pot add your fruit, honey and coconut sugar. Substitute honey for the coconut sugar if you prefer. You can always adjust the amount of sweetener used depending on how sweet the fruit is. Heat until the sugar has melted and fruit is warm but not cooked.
To assemble, take the baking dish with melted butter, pour batter mixture into the middle. Again, into the middle, add the warm fruit mixture. Do not spread out!
Place in the oven and bake for about 45 minutes or until golden and crisp on top. Serve warm or cool. I like it best served with vanilla ice cream.
Monday, May 20, 2013
Carob Cherry Granola, Gluten Free
Carob Cherry Granola, GF
Ingredients:
2 1/2 cups gluten free oats
3 tablespoons sesame seeds
3 tablespoons ground flax seeds
1/4 cup carob powder
3 packets stevia (NuNaturals brand)
1/4 cup + 2 tablespoons honey
1/4 cup olive oil
pinch of salt
1/2 cup dried cherries
Instructions:
Preheat oven to 300 degrees F.
In a large bowl, add oats, sesame seeds, flax seeds, carob powder, and pinch of salt. Mix well to incorporate ingredients evenly.
In a medium bowl, add honey, olive oil, and stevia packets and mix well.
Add the wet ingredients into the dry and toss to coat evenly.
Spread out on greased baking sheet or silpat mat placed on top of baking sheet.
Bake for 30 minutes, stirring about every 10 minutes.
Once removed from the oven, add 1/2 cup dried cherries.
Let cool completely before storing.
Ingredients:
2 1/2 cups gluten free oats
3 tablespoons sesame seeds
3 tablespoons ground flax seeds
1/4 cup carob powder
3 packets stevia (NuNaturals brand)
1/4 cup + 2 tablespoons honey
1/4 cup olive oil
pinch of salt
1/2 cup dried cherries
Instructions:
Preheat oven to 300 degrees F.
In a large bowl, add oats, sesame seeds, flax seeds, carob powder, and pinch of salt. Mix well to incorporate ingredients evenly.
In a medium bowl, add honey, olive oil, and stevia packets and mix well.
Add the wet ingredients into the dry and toss to coat evenly.
Spread out on greased baking sheet or silpat mat placed on top of baking sheet.
Bake for 30 minutes, stirring about every 10 minutes.
Once removed from the oven, add 1/2 cup dried cherries.
Let cool completely before storing.
Friday, May 10, 2013
Cashew Spinach Pesto
Ingredients
1 cup roasted, salted cashews
3 large handfuls of spinach
2 cloves garlic
2 tablespoons olive oil
2 tablespoons water
Juice from 1 lemon
salt to taste
generous sprinkle of red chili flakes (optional)
Instructions
In a food processor, add cashews, garlic, lemon juice. Blend until cashews turn into small chunks. You may need to stop and scrape down the sides.
While the cashews are blending, add spinach through the feeding tube of the food processor.
Stop to scrape down sides and add water, salt and red chili flakes.
Continue to blend until desired consistency. I tend to like mine with some texture.
Ingredients
1 cup roasted, salted cashews
3 large handfuls of spinach
2 cloves garlic
2 tablespoons olive oil
2 tablespoons water
Juice from 1 lemon
salt to taste
generous sprinkle of red chili flakes (optional)
Instructions
In a food processor, add cashews, garlic, lemon juice. Blend until cashews turn into small chunks. You may need to stop and scrape down the sides.
While the cashews are blending, add spinach through the feeding tube of the food processor.
Stop to scrape down sides and add water, salt and red chili flakes.
Continue to blend until desired consistency. I tend to like mine with some texture.
Labels:
appetizer,
cashews,
cheese free pesto,
dinner party ideas,
dip,
food,
foodie,
gluten free,
greens,
healthy,
natural,
olive oil,
pesto,
pesto alternative,
recipe,
snack,
Spinach,
spread,
vegan
Tuesday, May 7, 2013
Gluten Free Strawberry Pancakes
Gluten and Refined Sugar Free Strawberry Pancakes Topped with Marinated Strawberries in a Ginger Honey Syrup.
In my last post, I created a recipe for ginger honey syrup to be used in a drink recipe. I still had half a jar left so I thought of what else I could use it in. As a lover of pancakes, it could make a nice alternative to maple syrup. Although the consistency was much thinner I decided to use it as a marinade for chopped strawberries and use that as the topping.
Prep the strawberries before you start on the pancakes so they have time to soak up the flavor of the syrup.
In my last post, I created a recipe for ginger honey syrup to be used in a drink recipe. I still had half a jar left so I thought of what else I could use it in. As a lover of pancakes, it could make a nice alternative to maple syrup. Although the consistency was much thinner I decided to use it as a marinade for chopped strawberries and use that as the topping.
Prep the strawberries before you start on the pancakes so they have time to soak up the flavor of the syrup.
Marinade:
1 heaping cup of strawberries, chopped.
Place in a shallow dish and pour syrup (see previous post) over to coat the chopped berries.
Set aside until ready to top pancakes.
Ingredients:
Dry Ingredients
1/2 cup sorghum flour
1/2 cup buckwheat flour
1/4 tapioca flour
1/4 ground flax seeds
1/4 teaspoon baking soda
1/4 teaspoon baking powder
1/8 teaspoon xanthan gum
2 packets stevia (I use NuNaturals brand)
Pinch of salt
Wet Ingredients
1 tablespoon grapeseed oil
1 egg
1 cup almond milk (unsweetened)
1/2 cup Seascape strawberry jam from Sweet Lady Cook (sweetened with honey)
Instructions:
Preheat a large pan on the stove top.
In a medium bowl, add all of your dry ingredients and mix well to combine.
In a larger bowl, beat the egg and whisk in the rest of the wet ingredients.
Add the dry to the wet while continually whisking. Beat until there are no more lumps.
Using a 1/4 cup measuring cup, scoop batter into heated greased pan on medium heat.
Cook for about 2 minutes on each side.
Makes 10 pancakes.
Plate pancakes and top with marinated strawberries. I also topped my pancakes with a scoop of plain Greek yogurt.
Wednesday, April 17, 2013
Gluten Free Stawberry Mascarpone Tart
Thanks to Instagram I discovered Sweet Lady Cook. Located in Santa Barbara, she specializes in small batch jams using local fruit, no preservatives and minimal sugar. I was so thrilled to see that she was located just 30 miles south of me! At the time she was only selling her product online. I placed an order and couldn't wait till my jams arrived. Along with strawberry habanero and blackberry lavender jam, I purchased her clementine marmalade for my mom. (I'm not a marmalade person.) Funny how that turned out to be my favorite. See previous post for my Gluten Free Clementine Marmalade Granola. It's been so much fun using her jams in my food experiments.
Using seasonal fruits, her newest flavor is a seascape strawberry! The smell was absolutely amazing upon opening the jar. I decided on making gluten free strawberry mascarpone tarts using an almond and date crust. For the full recipe "click on the link below."
Labels:
almond meal crust,
dessert,
food,
gluten free,
healthy,
local,
mascarpone,
medjool dates,
recipe,
seasonal,
stevia,
strawberry,
strawberry jam,
sweet lady cook,
tarts
Subscribe to:
Posts (Atom)