Sunday, October 25, 2015
Chocolate Chip Pumpkin-Zucchini-Banana Bread
I've posted quite a few breakfast bread recipes here. That's because they are so easy to whip up and a great way to have breakfast all week. Now that the weather is finally cooling down it's actually starting to feel like Fall. What do we do in Fall? Eat everything pumpkin! I'm not a PSL drinker but I do love everything else pumpkin. Just the other night I made a vegetarian green curry with pumpkin. It was so spicy and delicious. That should be a future post. Having leftover roasted pumpkin from that evening, I mashed it up and turned it into Chocolate Chip Pumpkin-Zucchini-Banana Bread. This bread is really yummy! I like to serve it toasted (so the chocolate melts) with almond butter and sliced banana. It's also a filling fiber rich meal which will keep you going until lunch.
Ingredients:
Dry ingredients
½ cup gluten free oat flour (blended up oats)
½ cup rice flour
¼ cup gluten free oat bran
¼ cup ground flax
¼ cup tapioca starch
¼ cup coconut sugar
2½ teaspoons baking powder
1 teaspoon baking soda
½ teaspoon salt
½ teaspoon xanthan gum
1 teaspoon cinnamon
A few dashes of ground ginger
A dash or two of ground cloves
Wet ingredients
1 cup mashed pumpkin (canned pumpkin could also be used.)
1 medium banana, broken into smaller pieces
⅓ cup canola oil
⅓ cup blackstrap molasses
2 teaspoons vanilla extract
¼ cup almond milk
1 egg
Add ins
1 medium zucchini, grated
½ cup semi-sweet chocolate chips
To make:
Preheat oven to 350 degrees. In a large bowl, sift together all dry ingredients. Gently mix to combine. In a food processor, blend all of your wet ingredients except for the egg. Once all wet ingredients have been mixed, add your egg and blend for a few seconds. Pour wet ingredients into the dry and mix together until all of the flour blend is saturated. Fold in zucchini and chocolate chips. Pour into a greased loaf pan and bake for 50-55 minutes.
Labels:
baking,
banana bread,
blackstrap molasses,
bread,
breakfast,
food,
gluten free,
meal prep,
pumpkin bread,
recipe,
zucchini bread
Monday, September 28, 2015
Copenhagen
Unfortunately, our trip to Copenhagen was delayed an entire day. Yes, I just said an entire day. The whole thing was a bit of a nightmare. Before we were even notified about the delay, the Saturday before departure we received a text notification from Norwegian saying that due to delays the airline was experiencing, we would be transferred from the Dreamliner to a plane from Hifly airlines. Never heard of them? Neither have I nor anyone else I told this story to. Hifly is a charter airline that leases planes to other airlines. With a 10 hour flight ahead of us we were pretty bummed being transferred from the comforts of the Dreamliner. Come Monday morning we receive another text notification that our flight is now delayed until 3:00pm the following day. I've heard of flights being delayed a few hours, maybe 5 but an entire day? ... A couple of hours later another text comes through with a new time of departure at 5pm... And one more, thankfully the last one later that afternoon with a new departure time of 7:10pm. A whole 24 hour delay. As stressed out, pissed off, and wondering if we were ever going to make it over there, I'm truly thankful for the way the universe unfolded itself that day. That evening, after traveling to 3 different vets and ending up two and a half hours away from home, I had to put my dog down. It was the hardest most emotional situation I have ever been in. I'm forever grateful that I was able to spend his last day with him and hold him during his passing into doggy heaven.
The next morning was rough waking up without him. Still having to finish packing and get myself ready I didn't have much time to mourn. It was good that I would be away so long. I don't know how I would have ever gotten out of bed otherwise.
Thankfully, everything went as scheduled with no more delays. We were still a bit bummed that we got transferred to the HiFly charter plane but how bad could it be? It was BEYOND AWFUL! The plane was old, my seat was coming apart and we feared that the overhead center bins were going to break off due to how much they shook. The staff also failed to close some of the overhead bins before takeoff. One of the things they mentioned in the text notification was there would be limited entertainment. We spoke with a customer service rep who assured us there would be movies just not a large selection to choose from. With a long flight it's nice to watch a movie. There were no movies and no entertainment. Ashley asked a flight attendant if the tv screens on the back of the seats worked and he gave her the most bizarre look, said yes, and walked away in a hurry. The rest of the flight attendants were just as horrible. It was as if we were all an annoyance to them. They ran out of pillows and blankets as well as water. Yes, I just said water. During the last few hours of our flight I walked to the kitchen area and asked if I could get my water bottle filled. The attendant told me they are almost out of water and gave me a tiny cup with about 2 sips worth. Overall it was my worst flying experience and I'm not sure if I will ever fly internationally with Norwegian again. I would have much rather paid more for a decent flight that was on time. It was the best feeling walking off that plane. We knew that nothing on this trip could be a horrible as what we just experienced. Everything after our rough, rough start was indeed perfect!
Where we stayed:
With an entire day lost to delays we only had an afternoon and evening to see Copenhagen. Our first stop was checking in to our Airbnb. Henriette was a great host and flexible with all of our time changes. Her flat was very comfortable and in a great area for walking to what we wanted to see. She showed us in and pointed out some places on the map that we shouldn't miss with the short time we had. As a local, she pointed out some trendy bar and restaurant areas. I sheepishly asked about Nyhavn which she pointed out but said it wasn't worth seeing as it's full of tourists. We were tourists and it was actually something we did really want to see. It's iconic Copenhagen.
| The beautiful streets of Copenhagen. |
| Near the Kastellet. |
What we did:
After a quick freshening up from our long flight we hit the streets. We made our way towards the The Little Mermaid stopping to walk through the Kastellet. Now a public park and historical site the Kastellet is one of the best preserved star fortresses of Northern Europe.
Being from Solvang, the Danish capital of America, we had to see The Little Mermaid. We have a replica in our town. The Little Mermaid is indeed small as everything I read said she would be but she and the views were beautiful.
| The Little Mermaid |
| Nyhavn |
| Grab a beer and sit along the water. |
After relaxing for a bit and taking in all of the harbor we got back on our feet. We made our way towards our Airbnb while looking for a place to stop for dinner. We popped into Halifax on Frederiksborggade. It's a hip burger joint with a few locations around the city. You pick your burger, bun, patty type (they have vegan and vegetarian options), side, and sauce. I went with the Kreta, a Greek inspired burger and a cider to drink. The burger was really delicious. Staff and ambiance were great here as well. We walked home along The Lakes on Øster Søgade. It's a beautiful walk in the evening. We had to get up early the next morning to catch our flight to Stockholm so we called it an early night. Even though we had a very limited time in Copenhagen it was wonderful. The city was clean, beautiful, and easy to navigate. It was so motivating to see how active everyone was. There were many locals we saw earlier in the day walking, jogging and biking. The city is super bike friendly and we were surprised to see that no one locks up their bikes!
If you are into juice and smoothies, another place worth checking out is Joe & The Juice. They have locations in the airport as well as in the city. We got a juice upon arrival and the morning we flew to Stockholm. I can't remember what the one I got was (maybe the sports drink?) but it had passion fruit in it. I ordered it again the next morning because it was that good!
Also, food options in European airports are 100 times better than anything you would find in the States. Ash and I shared a grilled chicken cheese sandwich and a pastry for breakfast. I really wished my stomach was bigger. I just wanted to eat everything I saw.
I will be back for you, Copenhagen!
![]() |
| Wishing we got one of each to try. |
Tuesday, September 15, 2015
Roasted Banana Coconut Ice Cream with Chocolate Covered Almond Pieces
Ice cream is by far my favorite dessert. I always crave it. You would think that since I have my own ice cream maker, I would have a handmade batch on hand at all times. The truth is, I've only made real ice cream once. And it wasn't even for me! I have experimented with many alternative ice creams though. When I cook for myself at home, I always try to eat healthy and well. I don't worry about what I eat as much when my boyfriend and I prepare meals or go out. I love my burgers and will forever love him for introducing me to Queso, Texas style (Velveeta and Rotel). Having a balance in your diet is important. I give props to those who can restrict to the max, but for me, that is not possible. I love food too much! Anyway back to the ice cream. This is a non-dairy ice cream made with a base of bananas and coconut cream. The coconut cream gives off such a creamy texture! The ice cream itself is made without any refined sugars. (Cane sugar is an ingredient in the chocolate used to make the chocolate covered almonds.) This is a super simple recipe that you can feel good about eating.
Roasted Banana Coconut Ice Cream with Chocolate Covered Almond Pieces
Ingredients:
For ice cream
4 ripe bananas
2 tbs coconut sugar
3 tbs melted coconut oil
1 can coconut cream (I use Trader Joe's brand)
4 tbs agave nectar
½ teaspoon almond extract
Juice from half a small lemon
¼ teaspoon kosher salt
For chocolate covered almonds
½ cup semi-sweet chocolate chips
½ cup slivered toasted almonds
1 teaspoon coconut oil
pinch of salt
generous pinch or two of coconut sugar
To make:
Preheat oven to 370 degrees F. Peel bananas and slice lengthwise. Lay bananas flat side down on a silpat or foil lined baking sheet. Sprinkle with coconut sugar and drizzle with the coconut oil. Gently roll bananas around the baking sheet to coat with the sugar and oil. Bake for 20 minutes. Remove from oven and let sit for 5 minutes. Add bananas and sugary goop to a food processor and blend till smooth. Scrape down sides of the bowl and add coconut cream, agave, lemon juice and salt. Blend again to incorporate all ingredients. Transfer food processor bowl to the fridge and allow mixture to cool for at least 15 minutes. Pour into ice cream maker and follow manufacturer's instructions.
Now it's time for the chocolate covered almonds! In a small saucepan over very low heat add your chocolate chips and and coconut oil. Stir constantly to prevent chocolate from burning. Once your chocolate is melted and smooth, remove from heat and mix in almonds. Stir to coat evenly and spread out mixture on a small baking tray lined with parchment or foil. Sprinkle with salt and coconut sugar. Place in the freezer to set.
About 2 minutes before the ice cream churning is complete, remove chocolate covered almonds from the freezer. Break apart with your hands or roughly chop. Add them to the ice cream.
After ice cream is done, transfer to a loaf pan and place in freezer overnight or for at least a few hours, until firm.
Thursday, September 10, 2015
Know Before You Go
The following list is compiled of information I received from family, friends, travel websites and personal blogs prior to leaving on my trip. All the information I obtained was super-helpful and made me feel more comfortable before my departure.
- Make sure your passport is current. Most countries will not let you enter if your passport will expire within the next 6 months. Be smart and renew in plenty of time before you depart on your grand adventure.
- Get a chip and pin card. Most credit card companies are now transitioning to this card anyway. I was advised to get this type of card as no one takes the magnetic strip kind. It depends on where you go. Some places still do in fact take the old card but the chip and pin is becoming the new normal. Also, check what the foreign transaction fee is for using your card. I actually went ahead and got a new card for the trip. It has no foreign transaction fee and is a travel rewards card. Here is an article I found on Nerd Wallet to help inform you of your best options.
- Bring your debit card. It's always wise to have at least two cards with you in case one doesn't work or is lost or stolen. Only use your debit card for withdrawing cash at the ATM. Cash was actually my preferred way to pay for things abroad. Ticket machines at the airport or train station usually only take cards but eating out and and other small purchases were much easier using the local currency. *** Always remember to communicate to your bank and credit card company that you will be out of the country. Let them know the length of time you will be away and the country/countries you will be visiting.
- Make copies of important documents. It's smart to make two copies of: your passport, health insurance, credit and debit cards. Take one set with you (keep it in a separate place from where you will keep your cards and cash in case of theft) and leave the other at home with someone. Also make sure you have the 1-800 number for your credit cards if anything were to happen to them.
- Leave a copy of your itinerary at home with someone. If you are like me then you will have a typed out itinerary two months before you go. (I was really, really excited about this trip!) It's helpful to have this information written down in the event that anything were to happen to you. Important information: Airlines and flight numbers, where you will be staying and for how long, with the address and a phone number if possible.
- Don't forget to pay your bills and rent. With the excitement of planning your trip this will be the last thing on your mind. It definitely was on mine and I'm so thankful I read this tip before leaving. If you make payments online you can schedule to have them be paid while you are away. As for rent and other utilities, have your payments ready to be sent and have someone at home mail them for you.
- Pack light. I was told by numerous people to do this. I'm normally an over-packer so what I thought was "packing light" was still over-packing by a long shot. Check back for my Packing Essentials post as I will go into more detail and include items not to be forgotten.
Friday, September 4, 2015
Travel Tips & Planning
| Make sure your passport is current and get out and explore! |
For two and a half weeks this summer I was fortunate enough to travel around Europe. It was such a life enriching experience. I highly encourage anyone to get out and explore this vast world we live in. With the advice of a friend overseas, we planned our journey to tour diverse countries so each place offered something different. I'm so thankful for that advice because each country was in fact so diverse. The line-up was: Copenhagen, Stockholm, Uppsala, Amsterdam, Prague and London. This whole trip came about because my good friend, Ashley was invited to a wedding in Sweden. She mentioned she was going and planned on traveling for two weeks, hinting that I come along. Of course my obvious answer was YES! The summer months are crazy busy with work so I didn't entirely think it was possible to get away for that amount of time. Yet my boss was so encouraging when I asked. From that point on, the next five months were dedicated to travel research. I can't stress enough how important it is to do your research before hand. Read, read, read anything you can get your hands on. I still regret not reading more before I left. Researching beforehand helps tremendously with planning your days for what you want to do, see and most importantly eat!
Outlets for travel research:
- Local Library - My library had a decent selection of up to date travel guides. Most libraries can transfer books within their branch so inquire if you don't see what you are looking for.
- Wikitravel - This site is awesome! They offer comprehensive guides including history, districts of the city (super helpful for deciding where to stay), climate, getting around (great tips for transferring to and from the airport), architecture, local cuisine, etc.
- YouTube - another great outlet to familiarize yourself with the city. It was also a nice break from reading.
- Pinterest - A great collection of articles from websites as well as travel and personal blogs.
- Social Media - Put it out there that you are going on a trip. Ask for advice on what to see and eat during your travels. I received two amazing guides from a girl in London I follow on Instagram and someone who lives in Amsterdam. It's a great way to get a locals perspective.
- Hostels - I like my privacy and have to pee far too much to venture out into the halls at night. Hostels are not for me but I know so many people love them. They are great for the budget traveler and those who want to meet fellow visitors.
- Hotels - Hotel stays are generally comfortable and familiar. (It's always smart to read reviews on Trip Advisor or Yelp.) Hotel rooms may be tiny, but they provide many amenities that "Americans" want when traveling. The front desk staff was always kind and helpful when we called down for more pillows or any questions we had. It's also a plus when breakfast is included in the room rate. When breakfast is available at an additional cost, I suggest grabbing a coffee and pastry from the local bakery or cafe.
- Airbnb - This was my first experience using Airbnb. It's a great way to get a feel for what it's like to live in the city. Some apartments are smack in the city center while others are in more residential areas. This lends to a nice break from the bustle of the city. Having a kitchen allows you to cook meals yourself and save on the cost of food while traveling. We found that the local grocery stores offered a wide variety of foods at low prices. Overall, I found Airbnb's cheaper than a hotel stay, especially sharing the cost with your travel partner. They also offered more space than a tiny hotel room.
Our Airbnb in Amsterdam overlooked a canal. - *Tips for booking your first Airbnb or if you are wondering why you keep getting declined. Unless the host offers instant book it's always best to message them prior to sending a request to book. I was continually getting declined and didn't understand why. Even though the selected days show availability, they are sometimes not. I read somewhere online that it's best to send a message asking if their apartment/home is available for your travel dates. Once I did this I received messages back with either, yes, and a pre-approval to book or no, and declined.
- Friends or Family - Traveling is expensive and the cost of accommodations add up. If you have any friends or family where you will be traveling, politely ask if they have any extra room for you. Ashley's friend in Sweden was so thrilled we were traveling all that way to attend her wedding she arranged for us to stay in a family members apartment for a few nights while they were out of town.
- Unless you are going to wing it upon arrival at your destination, it's wise to book as soon as you know when you will be traveling. We used Google Flights to compare airline prices.
- Pre-book attractions you don't want to miss. What I thought was far enough in advance for the Anne Frank House (2 months) was not enough. All tickets were sold out. Luckily I found a walking tour through Get Your Guide. It was a 1.5 hour walking tour through Amsterdam with skip-the-line tickets to the House. Once we passed the mile long queue, I was so happy I purchased them in advance.
Have any travel planning tips of your own? Leave them in the comments below.
Wednesday, June 10, 2015
Chicken & Veggie Patties
Tuesday is my "Sunday" so I typically do most of my meal prepping on this day. The last few weeks I made different kinds of patties. Whether they are a mixture of chicken/veggie, veggie/beans/rice, or even tuna with sprouted peas and lentils (which were really delicious), they are the perfect option for lunches throughout the week. It's also a great way to use up leftover ingredients you have in your fridge. I normally just throw whatever I have in a bowl, mix it up and they turn out great. However, I figured I should measure out my ingredients this time so I can share the recipe. Check it out below and feel free to play around with ingredients and spices to tailor it to your liking. I tend to eat them cold with salads, but they can be heated up as well.
Ingredients:
1lb ground chicken
1 egg
1 cup spinach, chopped
½ cup red bell pepper, diced
½ cup tomato basil feta, or plain
¼ cup white onion, diced
¼ cup green olives, roughly chopped
2 cloves of garlic, minced
½ teaspoon smoked paprika
½ teaspoon cumin
¼ red chili flakes
Salt and pepper to taste
To make:
Preheat oven to 370ºF. In a medium/large bowl, combine all vegetables and spices. Stir to combine. Add ground chicken and use your hands to incorporate ingredients. Create a little well in the center of the bowl and add the egg. Again, use your hands to combine. Using a ¼ size measuring cup, scoop chicken mixture onto a lined and greased baking sheet. The measuring cup should create a nice patty shape. Once you have all your patties scooped, place them in the oven for 8 minutes. Flip and cook for an additional 8 minutes. Set your oven broil setting to low and cook for 2 more minutes. Remove from oven. Let cool for a few minutes if you will be eating them right away. You can enjoy these warm with a salad or make a burger out of them. I usually let them cool a bit longer before storing in the fridge.
Labels:
baked,
chicken,
dinner,
easy recipe,
food,
gluten free,
healthy,
lunch
Tuesday, May 19, 2015
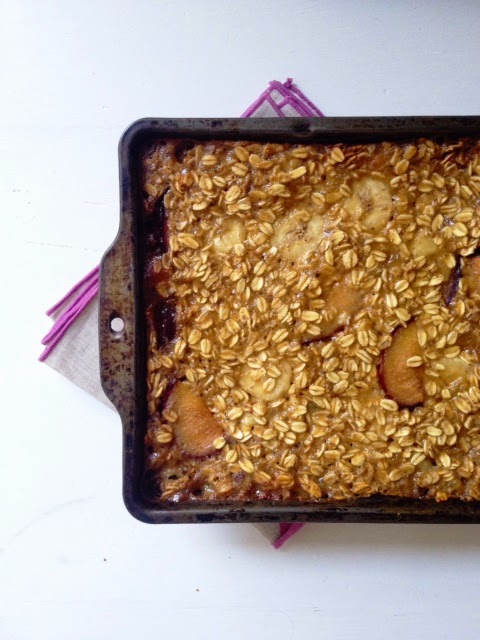
Banana-Plum-Raisin Oatmeal Bake
Last week my mom and I were down in Anaheim. Disneyland used to be the only thing I cared about in the area, but now I have a new stop I must make every time I'm down there. 99 Ranch Market! On a previous trip to Disneyland, my coworker took me to this amazing Asian market on our way home. I was in heaven. We spent over an hour browsing through all the spices, sauces, teas and yummy treats. Once we left I couldn't wait to return. They also have a hot food station, which I was dying to try on my next visit.
The food didn't disappoint. We got a few snacks to fuel us for shopping. Sugar cane shrimp, pork buns, scallion cakes, and turnip cakes. Everything was so fresh and delicious. I'm a huge Dim Sum fan, so this was perfect! The market is pretty big, so I suggested we start at one end and make our way down each aisle. I had a list of things I wanted to purchase again but also had my eyes open for new items I wanted to try. One item that caught my attention was a coconut spread (Ma Tamis Sa Bao). It's just coconut cream, brown sugar and water. It looks similar to caramel and has the same consistency.
This stuff is delicious! It's smooth and creamy with a subtle coconut flavor. I read online that it can be substituted for molasses in pecan pie. Now that is something I must do soon. Instead of dessert, I decided to use it in place of maple syrup in an oatmeal breakfast bake. The finished product came out great. It's not too sweet and the flavors of the coconut with cooked bananas are just perfect. This oatmeal bake is gluten free and vegan friendly.
Ingredients:
2¼ cup gluten free oats
1 tablespoon ground flax seeds
1½ teaspoon baking powder
¼ teaspoon kosher salt
2 bananas, 1 sliced and reserve the other for wet ingredients
1 plum, sliced
½ cup golden raisins
1 can (14oz) light coconut milk
⅓ cup coconut spread
1 teaspoon vanilla
To make:
Preheat oven to 370ºF. In a large bowl, add oats, ground flax, baking powder and salt. Stir to combine. Toss in sliced banana, plum and raisins and set aside. In a food processor, combine coconut milk, coconut spread, the remaining banana and vanilla. Pour wet ingredients into the dry and gently stir to saturate all of the oat mixture. Pour into a greased 8x8 baking dish. Press the mixture down gently with a spatula. Place in the oven and bake for 30 minutes. Let cool for at least 10 minutes before serving. I made this the day before and once cooled, I covered it and stored in the fridge. It reheats easily in the microwave or oven and if you'd like an extra kick of protein top with a scoop of cottage cheese or yogurt.
Labels:
99 ranch market,
banana,
breakfast,
food,
gluten free,
oatmeal bake,
plum,
raisin,
recipe,
vegan
Subscribe to:
Posts (Atom)